教學目標:
利用Python模擬出都卜勒效應的視覺化與數值化,實際”看到”,當波源與觀察者互相接近時,頻率上升,波長變短;當波源與觀察者互相遠離時,頻率下降,波長變長。
傳統教學缺點:
當我們要介紹都卜勒效應時,面臨兩大困境: 一、聲波是動態,黑板的板書無法呈現。二、生活體驗的都卜勒效應,易被聲音的大小聲(振幅)迷惑,誤以為靠近變大聲,遠離變小聲是都卜勒效應。課堂上僅介紹公式,學生無法體驗感受,屬於低學習成就的單元。
VPhysics教學優點:
利用學生改變參數,實際”看到”都卜勒效應的不同。
第一步,改變波源的速度,變成與觀察者速度相同=>觀察是否有都卜勒效應?。
第二步,改變觀察者的速度,變大變小=>觀察接受到波數的變化=>當觀察者速度大於波速,會有音爆(sonic bomb)、震波(shock wave)的產生。
第三步,由以上兩步驟,歸納出都卜勒效應的公式。
Python程式:
### doppler-Wavefront.py
### Doppler Effect for Sound (requires VPython)
### Rob Salgado
### salgado@physics.syr.edu http://physics.syr.edu/~salgado/
###
### v0.5 2007-02-27 tested on Windows XP/TabletPC
### with Python-2.3.4.exe and VPython-2003-10-15.exe
### 改寫: 中港高中王尊信老師 v.20170227
from visual import *
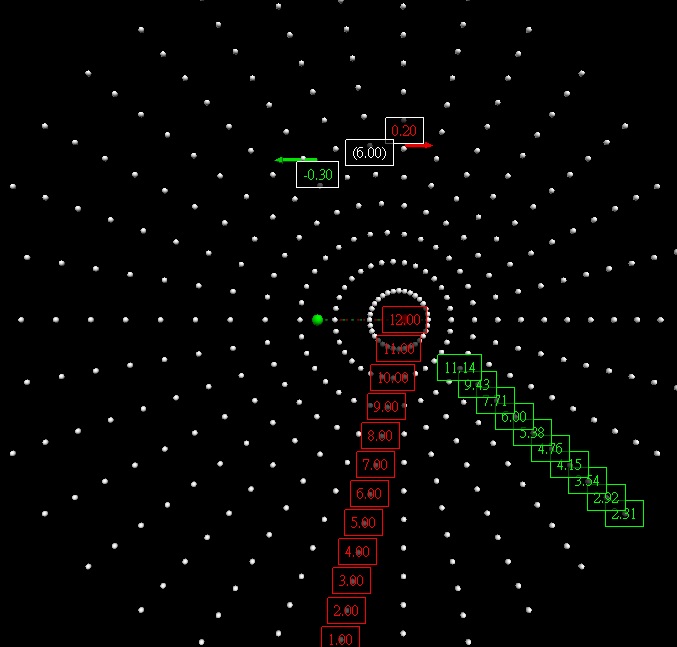
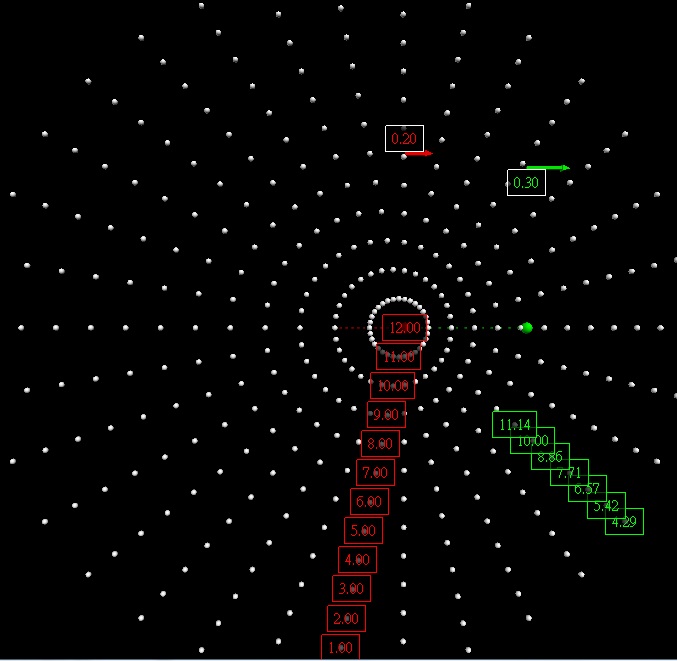
vs=0.20 #波源的速度
vr=0.30 #觀察者的速度
vw=0.00 #風速,預設為零,減少變因。原程式設為0.10
scene=display(x=0,y=0,height=700,width=700)
scene.autoscale=0
source=sphere(radius=0.2, pos=vector(0,0,0), vel=vector(vs,0,0), color=color.red)
receiver=sphere(radius=0.2, pos=vector(3,0,0), vel=vector(vr,0,0), color=color.green)
diffx=receiver.x-source.x
if diffx==0:
signdiffx=0
elif diffx==fabs(diffx):
signdiffx=1
else:
signdiffx=-1
windvel=vector(vw,0,0)
nudge=vector(0,6,0)
nudgev=vector(0,0.5,0)
vsarrow=arrow(pos=source.pos+nudge ,axis=5*vector(vs,0,0) , fixedwidth=1, shaftwidth=0.1, color=source.color)
vrarrow=arrow(pos=receiver.pos+nudge-nudgev ,axis=5*vector(vr,0,0),fixedwidth=1 ,shaftwidth=0.1, color=receiver.color)
if vw != 0: vwarrow=arrow(pos=nudge+2*vector(0,1,0) ,axis=5*vector(vw,0,0),fixedwidth=1 ,shaftwidth=0.1, color=color.cyan)
vslabel=label(pos=vsarrow.pos+nudge ,text=”%4.2f” %vs , color=source.color,box=1)
vrlabel=label(pos=vrarrow.pos-nudgev ,text=”%4.2f” %vr , color=receiver.color)
if vw != 0: vwlabel=label(pos=vwarrow.pos+vector(0,1,0) ,text=”wind speed= %4.2f” %vw , color=vwarrow.color)
tmax=12.
dt=0.005
twopi=2*math.pi
N=32
ball=[]
ball0flag=[]
sourcelabel=[]
receivedlabel=[]
def new_wave(t):
ball0flag.append(0)
sphere(radius=0.05, pos=source.pos, color=(.5,0,0) )
sphere(radius=0.05, pos=receiver.pos, color=(0,.5,0) )
for i in range(0,N):
theta=twopi*i/float(N)
ball.append(sphere(radius=0.1,pos=source.pos,
vel=vector(cos(theta),sin(theta),0) ))
sourcelabel.append( label(pos=ball[N*(len(ball0flag)-1)+3*N/4].pos, text=”%4.2f” %t,
color=source.color, linecolor=source.color ))
def meeting(t):
global signdiffx
label(pos=source.pos+nudge-nudgev/2.0, text=”(%4.2f)” %t,
color=color.white, linecolor=color.white )
print “(%4.2f)” %t
signdiffx=2
print “successive wavefronts received at time…”
new_wave(0)
told=0
#clock=label()
for t in arange(0,tmax+dt,dt):
rate(100)
# clock.text=”%f” % (t%1.0)
if t%1.0 < told%1.0:
# print “t=”,t, “len=”,len(ball)
new_wave(t)
told=t
if signdiffx==0:
if fabs(receiver.x-source.x)>0: meeting(t)
elif signdiffx==1:
if (receiver.x-source.x)<=0: meeting(t)
elif signdiffx==-1:
if (receiver.x-source.x)>=0: meeting(t)
for i in arange(len(ball)):
ball[i].pos += (ball[i].vel+windvel)*dt
source.pos += source.vel * dt
receiver.pos += receiver.vel * dt
vsarrow.pos=source.pos+nudge
vrarrow.pos=receiver.pos+nudge-nudgev
vslabel.pos=vsarrow.pos+nudgev
vrlabel.pos=vrarrow.pos-nudgev
for j in arange(len(ball0flag)):
sourcelabel[j].pos=ball[N*j+3*N/4 ].pos
if (ball0flag[j]==0 and
( (receiver.x >= source.x and ball[N*j].x >= receiver.x)
or (receiver.x <= source.x and ball[N*j+N/2].x < receiver.x)
)):
ball0flag[j]=1
print “%4.2f” %t
receivedlabel.append( label(pos=ball[N*j+(N-3)].pos, text=”%4.2f” %t,
color=receiver.color, linecolor=receiver.color ))
elif ball0flag[j]==1:
receivedlabel[j].pos=ball[N*j+(N-3) ].pos
#Now… WHEN AN OBJECT IS PICKED, 如果選擇某物體
#TRANSLATE THE scene.center TO THE OBJECT’S POSITION, THEN ZOOM 視窗將會移到此物體,放大
while 1:
rate(5)
if scene.mouse.clicked:
scene.mouse.getclick()
newPick=scene.mouse.pick
if newPick !=None:
tempcolor=newPick.color
newPick.color=color.yellow
#pick_r=newPick.x*4.
#string= “r=%7.5f” % pick_r
#label(pos=newPick.pos,text=string,xoffset=-5,yoffset=5)
target=newPick.pos
step=(target-scene.center)/20.
for i in arange(1,20,1):
rate(10)
scene.center +=step
scene.scale *= 1.037 #(1.037**19=1.99)
newPick.color=tempcolor
心得:
用Python學物理,並非一步登天,馬上要學會程式的撰寫。處在資訊時代,看懂程式,改適當的參數,是學Python可讀性高(read-ability)的優勢,充分利用這樣的優勢,讓物理變視覺化,幫助理解,是科學教育、創客精神(maker)重要的一環