AcerT350F2 Centos7 設定
一、Install vsftpd
yum install vsftpd
rpm -qi vsftpd

https://www.linuxtechi.com/install-vsftpd-server-centos-8-rhel-8/
http://blog.itist.tw/2016/08/build-ftp-server-with-vsftpd-on-centos-7.html

systemctl start vsftpd

systemctl enable vsftpd --now
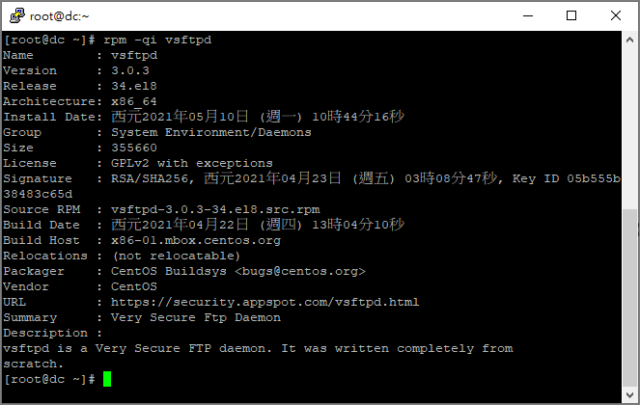
二、Rpm qi vsftpd
二、selinux check and firewall-cmd
getsebool -a getsebool -a | grep ftp
setsebool -P ftpd_full_access 1
setsebool -P ftpd_connect_all_unreserved 1

firewall-cmd --zone=public --add-service=ftp --permanent
firewall-cmd --reload
三、/etc/vsftpd/vsftpd.conf
anonymous_enable=NO
local_enable=YES
write_enable=YES
chroot_local_user=YES
allow_writeable_chroot=YES
userlist_file=/etc/vsftpd/user_list
userlist_deny=NO
# 禁止離開家目錄,並指定不受限制的使用者清單
chroot_local_user = YES
chroot_list_enable = YES
chroot_list_file = /etc/vsftpd/chroot_list
# 變更根目錄之後,開放根目錄的寫入權限
allow_writeable_chroot = YES
# 限制可登入的本機使用者,選擇以白名單來管理,並指定允許登入的使用者清單
userlist_enable = YES
userlist_deny = NO
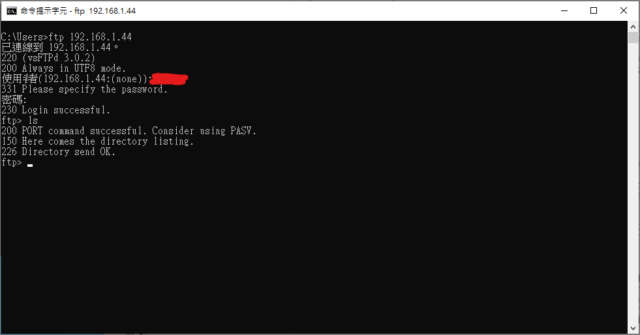
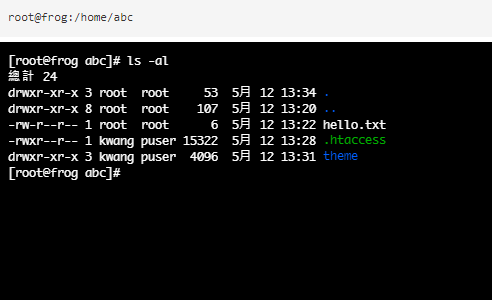
userlist_file - /etc/vsftpd/user_list四、ftp 192.168.1.44
五、解決/etc/passwd /sbin/nologin 無法FTP 認證問題
shell 為 /sbin/nologin 無法FTP 認證問題
vsftpd 會根據 /etc/shells 這個文件來判斷一個用戶是否是有效用戶
會阻止那些 shel l不在 /etc/shells 裡的用戶登入 vsftp
所以 ftp 使用者的shell為 /sbin/nologin 則修改 /etc/shells 文件
cat /etc/shells
 /bin/sh
 /bin/bash
 /usr/bin/sh
 /usr/bin/bash
 /bin/tcsh
 /bin/csh
 /sbin/nologin
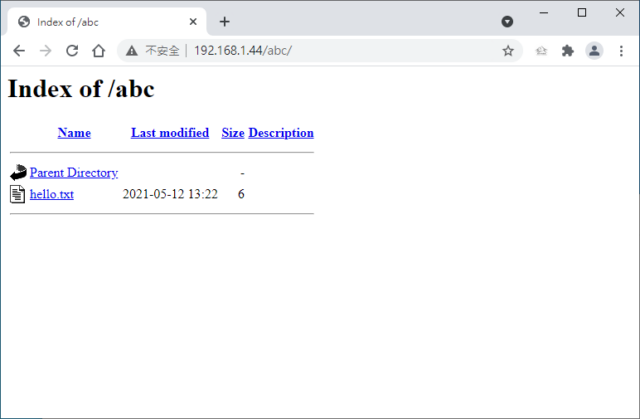
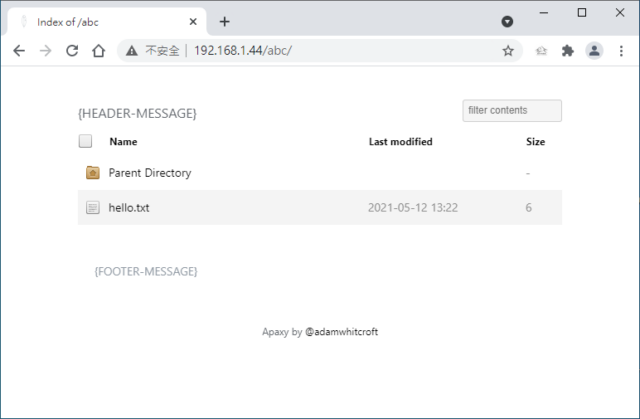
六、顯示Apache目錄列表
/etc/httpd/conf.d/abc.conf

Alias /abc "/home/abc/"
<Directory "/home/abc/">
    IndexOptions Charset=UTF-8
    Options Indexes FollowSymLinks MultiViews
    AllowOverride all
    Order deny,allow
    Allow from 127.0.0.1
    Allow from 192.168.1.0/24
    Deny from all
</Directory>
Indexes FollowSymLinks MultiViews Indexes 啟用目錄列表。 -Indexes 禁用目錄列表 FollowSymLinks,可以讓目錄下的連結檔作用,目前的設定是開啟。
七、apaxy
https://oupala.github.io/apaxy/
apaxy is a customisable theme built to enhance the experience of browsing web directories. It uses the mod_autoindex Apache module – and some css – to override the default style of a directory listing.
- download and unzip apaxy
- copy and paste the contents of the
/apaxyfolder to your/sharefolder - edit
htaccess.txt(now in the/sharefolder) and update all instances of paths marked with {FOLDERNAME} to point to your site root
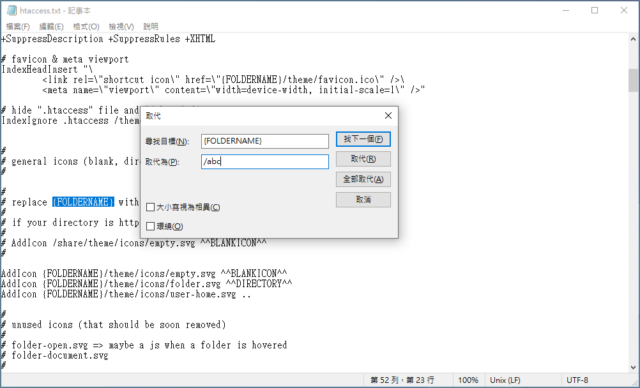
once done, rename htaccess.txt to .htaccess in the /abc directory
八、restorecon命令
https://man.linuxde.net/restorecon
[root@starfish home]# ls -Z
 drwx------. ang ang unconfined_u:object_r:user_home_dir_t:s0 ang
 [root@starfish home]#restorecon -Rv ang
 語法
 restorecon [-iFnrRv] [-e excludedir ] [-o filename ] [-f filename | pathname…]

 選項
 -i:忽略不存在的文件。
 -f:infilename 檔 infilename 中記錄要處理的檔。
 -e:directory 排除目錄。
 -R/-r:遞迴處理目錄。
 -n:不改變檔標籤。
 -o/outfilename:保存檔清單到 outfilename,在檔不正確情況下。
 -v:將過程顯示到螢幕上。
 -F:強制恢復檔安全語境。
九、Default basic
.bash_profile
cat .bash_profile

 # .bash_profile

 # Get the aliases and functions
 if [ -f ~/.bashrc ]; then
 . ~/.bashrc
 fi

 # User specific environment and startup programs

 PATH=$PATH:$HOME/bin

 export PATH
.bashrc
cat .bashrc
 # .bashrc


 # User specific aliases and functions


 alias rm='rm -i'
 alias cp='cp -i'
 alias mv='mv -i'


 # Source global definitions
 if [ -f /etc/bashrc ]; then
 . /etc/bashrc
 fi
十、apache 2.4 存取限制的語法
完整 ip
Require ip 192.168.1.53
Require ip 192.168.1.53 192.168.1.101

部分 ip
Require ip 10.10
Require ip 10.10.20 192.168.3

網段/遮罩
Require ip 192.168.1.0/255.255.255.0
Require ip 192.168.1.0/24
[root@blue ~]# cat /etc/httpd/conf.d/public.conf

Alias /public "/home/public"

<Directory "/home/public/">
    IndexOptions Charset=UTF-8
    Options Indexes FollowSymLinks MultiViews
    AllowOverride all

    #Require all granted
    Require local
    Require ip 192.168.1.0/24
    #Require ip 101.136.165.0/24
    Require ip 163.17.51.0/24

    #Require ip 123.123.123
    #Require ip 123.123.123.0/255.255.255.0
    #Require ip 123.123.123.0/24
</Directory>
要讓 httpd 寫入目錄 /home/public
# chcon -t httpd_sys_rw_content_t /home/public

ls -Z
drwxr-xr-x. root  root  unconfined_u:object_r:httpd_sys_rw_content_t:s0 public

要讓 httpd 讀取 /home/public 目錄
# chcon -R -t httpd_sys_content_t /home/public

ls -Z
drwxr-xr-x. root  root  unconfined_u:object_r:httpd_sys_content_t:s0 public

restorecon -v -R public

restorecon reset /home/public context unconfined_u:object_r:httpd_sys_content_t:s0->unconfined_u:object_r:user_home_dir_t:s0
[root@t310f3 home]# ls -Z
drwxr-xr-x. root  root  unconfined_u:object_r:user_home_dir_t:s0 public
SELinux訪問控制錯誤
SELinux is preventing /usr/sbin/httpd from read access on the directory public.
This is caused by a newly created file system.
you need to add labels to it.
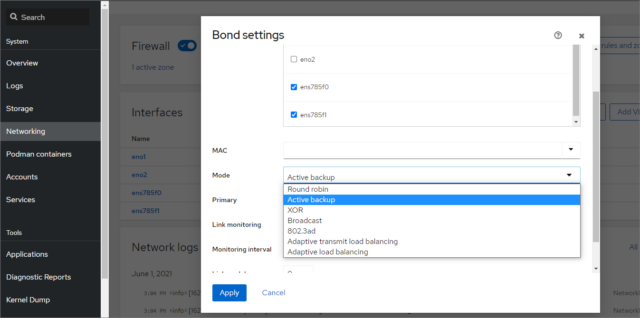
/sbin/restorecon -R -v public十一、使用 Cockpit 設定網卡 bond
1.Networking Add bond
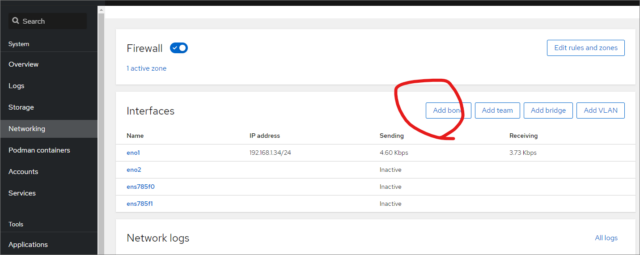
2.Bond settings
十二、Configure NFS Server
Configure NFS Server

yum -y install nfs-utils

vi /etc/exports

# write settings for NFS exports
/home/ 192.168.1.0/24(rw,no_root_squash)

systemctl start rpcbind nfs-server
systemctl enable rpcbind nfs-server

firewall-cmd --add-service=nfs --permanent
firewall-cmd --add-service={nfs3,mountd,rpc-bind} --permanent
firewall-cmd --reload


確認NFS伺服器啟動成功:
rpcinfo -p

exportfs -r

exportfs
/home           192.168.1.0/24

showmount -e abc.com.tw

Export list for abc.com.tw:
/home 192.168.1.0/24


onfigure NFS client 安裝NFS 客戶端

yum install -y nfs-utils
systemctl enable rpcbind.service
systemctl start rpcbind.service

showmount -e abc.com.tw

Export list for abc.com.tw:
/home 192.168.1.0/24

mount -t nfs abc.com.tw:/home /home/dc
十三、storcli /c0/v0 set wrcache=wb
storcli /c0/v1 set wrcache=wt
storcli /c0/v1 show all
VD1 Properties :
==============
Strip Size = 128 KB
Number of Blocks = 46874992640
VD has Emulated PD = Yes
Span Depth = 1
Number of Drives Per Span = 5
Write Cache(initial setting) = WriteBack
Disk Cache Policy = Disabled
Encryption = None
Data Protection = Disabled
Active Operations = None
Exposed to OS = Yes
OS Drive Name = /dev/sdb
Creation Date = 31-05-2021
Creation Time = 02:06:58 AM
Emulation type = default
Is LD Ready for OS Requests = Yes
SCSI NAA Id = 600605b0059af2d028470142148b8f14
Unmap Enabled = N/A
php7.4、MariaDB10.5、cockpit、xrdp、samba、Webmin
Centos7 install php7.4

yum -y install https://rpms.remirepo.net/enterprise/remi-release-7.rpm
yum -y install yum-utils
yum repolist all | grep php
yum-config-manager --enable remi-php74
yum update

Install MariaDB 10.5 on CentOS 8 | CentOS 7

vi /etc/yum.repos.d/mariadb.repo

[mariadb]
name = MariaDB
baseurl = http://yum.mariadb.org/10.5/centos7-amd64
module_hotfixes=1
gpgkey=https://yum.mariadb.org/RPM-GPG-KEY-MariaDB
gpgcheck=1

yum makecache
yum repolist

yum install MariaDB-server MariaDB-client

systemctl start mariadb
systemctl enable mariadb

sudo firewall-cmd --add-service=mysql --permanent
sudo firewall-cmd --reload

mysql_secure_installation

mysql -u root -p


systemctl set-default multi-user.target
yum -y install epel-release
yum -y install xrdp tigervnc-server cjkuni-uming-fonts ibus ibus-table-chinese-array samba
systemctl restart xrdp.service
systemctl enable xrdp.service
firewall-cmd --permanent --zone=public --add-port=3389/tcp
firewall-cmd --reload
systemctl enable smb nmb
systemctl restart smb nmb
firewall-cmd --zone=public --add-service=samba --permanent
firewall-cmd --reload

setsebool -P samba_enable_home_dirs on
setsebool -P samba_export_all_ro on
setsebool -P samba_export_all_rw on

yum install -y cockpit cockpit-packagekit cockpit-pcp cockpit-storaged cockpit-dashboard setroubleshoot-server logwatch
systemctl enable --now cockpit.socket
firewall-cmd --permanent --add-service=cockpit
firewall-cmd --reload


yum install -y php php-mysqlnd php-fpm mariadb-server httpd tar curl php-json php-gd php-zip
firewall-cmd --permanent --zone=public --add-service=http
firewall-cmd --permanent --zone=public --add-service=https
systemctl enable mariadb
systemctl enable httpd
systemctl start mariadb
systemctl start httpd
setsebool -P httpd_can_network_connect 1
mysql_secure_installation


webmin

vi /etc/yum.repos.d/webmin.repo

[Webmin]
name=Webmin Distribution Neutral
#baseurl=https://download.webmin.com/download/yum
mirrorlist=https://download.webmin.com/download/yum/mirrorlist
enabled=1

wget https://download.webmin.com/jcameron-key.asc
rpm --import jcameron-key.asc
yum -y install webmin

firewall-cmd --add-port=10000/tcp --permanent

firewall-cmd --reload