LibreNMS
一、https://www.librenms.org/

二、安裝 LibreNMS
2-1.自動化安裝LibreNMS
https://github.com/BensonRUEI/Librenms-Install-Shell
2-2.LibreNMS VMs virtualBOX
https://docs.librenms.org/Installation/Images/
2-3.Image download
https://github.com/librenms/packer-builds/releases/tag/1.63
3.How to Install LibreNMS on CentOS 8
1 dnf -y update 2 systemctl set-default multi-user.target 3 systemctl get-default 4 yum install ibus-libzhuyin -y 5 yum install ibus ibus-table-chinese-array -y 6 dnf install epel-release -y 7 dnf install xrdp -y 8 systemctl enable xrdp --now 9 firewall-cmd --add-port=3389/tcp --permanent
10 firewall-cmd --reload
11 dnf update
12 vi /etc/yum.repos.d/webmin.repo
13 wget https://download.webmin.com/jcameron-key.asc
14 rpm --import jcameron-key.asc
15 dnf install webmin
16 firewall-cmd --add-port=10000/tcp --permanent
17 firewall-cmd --reload
18 reboot -n
19 dnf update
20 dnf upgrade
21 clear
22 shutdown -h now
23 dnf -y install https://dl.fedoraproject.org/pub/epel/epel-release-latest-8.noarch.rpm
24 dnf -y install https://rpms.remirepo.net/enterprise/remi-release-8.rpm
25 vi /etc/selinux/config
26 reboot -n
27 dnf install bash-completion cronie fping git ImageMagick mariadb-server mtr net-snmp net-snmp-utils nginx nmap php-fpm php-cli php-common php-curl php-gd php-json php-mbstring php-process php-snmp php-xml php-zip php-mysqlnd python3 python3-PyMySQL python3-redis python3-memcached python3-pip rrdtool unzip
28 useradd librenms -d /opt/librenms -M -r -s /usr/bin/bash
29 cd /opt && git clone https://github.com/librenms/librenms.git
30 chown -R librenms:librenms /opt/librenms
31 chmod 771 /opt/librenms
32 setfacl -d -m g::rwx /opt/librenms/rrd /opt/librenms/logs /opt/librenms/bootstrap/cache/ /opt/librenms/storage/
33 setfacl -R -m g::rwx /opt/librenms/rrd /opt/librenms/logs /opt/librenms/bootstrap/cache/ /opt/librenms/storage/
34 su - librenms
35 systemctl start mariadb
36 systemctl enable mariadb
37 mysql_secure_installation
38 myqll -u root -p
39 mysql -u root -p
40 vi /etc/my.cnf.d/mariadb-server.cnf
41 systemctl restart mariadb
42 cp /etc/php-fpm.d/www.conf /etc/php-fpm.d/librenms.conf
43 vi /etc/php-fpm.d/librenms.conf
44 vi /etc/nginx/conf.d/librenms.conf
45 cd /etc/nginx/conf.d/
46 ls
47 ls -al
48 vi /etc/nginx/conf.d/librenms.conf
49 vi /etc/nginx/nginx.conf
50 systemctl start nginx
51 systemctl enable nginx
52 firewall-cmd --zone public --add-service http
53 firewall-cmd --permanent --zone public --add-service http
54 firewall-cmd --zone public --add-service https
55 firewall-cmd --permanent --zone public --add-service https
56 cp /opt/librenms/snmpd.conf.example /etc/snmp/snmpd.conf
57 vi /etc/snmp/snmpd.conf
58 curl -o /usr/bin/distro https://raw.githubusercontent.com/librenms/librenms-agent/master/snmp/distro
59 chmod +x /usr/bin/distro
60 systemctl enable snmpd
61 systemctl restart snmpd
62 cp /opt/librenms/librenms.nonroot.cron /etc/cron.d/librenms
63 cp /opt/librenms/misc/librenms.logrotate /etc/logrotate.d/librenms
64 timedatectl
65 nano /etc/php.ini
66 vi /etc/php.ini
67 systemctl restart php-fpm
68 dnf module list php
69 sudo dnf module enable php:remi-7.4
70 dnf module list php
71 dnf module enable php:remi-7.4
72 dnf module reset php
73 dnf module enable php:remi-7.4
74 dnf install php
75 php --version
76 dnf install php
77 systemctl restart php-fpm
78 php --version
79 cd /etc/snmp/
80 ls
81 ls -al
82 vi snmpd.conf
83 cp snmpd.conf snmpd.conf.bak
84 vi snmpd.conf
85 systemctl restart snmpd
86 ip a
87 /bin/cat /sys/devices/virtual/dmi/id/product_name
88 clear
89 extend .1.3.6.1.4.1.2021.7890.1 distro /usr/bin/distro
90 /bin/cat /sys/devices/virtual/dmi/id/product_name
91 /bin/cat /sys/devices/virtual/dmi/id/sys_vendor
92 extend distro /usr/bin/distro
93 /usr/bin/distro
94 reboot -n
95 update
96 yum update
97 yum upgrade
98 exit
99 ls
100 ls -al
101 cd /etc/cron.daily/
102 ls
103 ls -al
104 find / -name daily.sh
105 cd /opt/librenms/
106 ls
107 ./daily.sh
108 yum update
109 exit
110 history
111 clear
112 history
113 history > history.txt
三、FortiGate 啟動 SNMP
1.How to Configure FortiGate SNMP Agent for Monitoring
https://kb.fortinet.com/kb/documentLink.do?externalID=FD45755
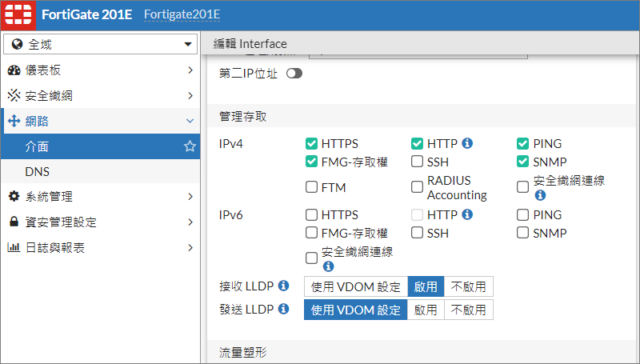
1-1.To configure SNMP access – GUI:
1) Go to Network -> Interfaces
2) Choose an interface that an SNMP manager connects to and select ‘Edit’
3) In Administrative Access, select ‘SNMP’
4) Select ‘OK’
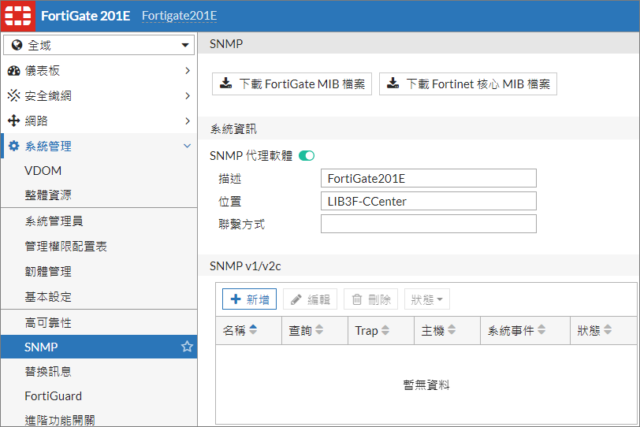
1-2.To configure the SNMP agent – GUI:
1) Go to System -> SNMP
2) Select ‘Enable’ for the SNMP Agent
3) Enter a descriptive name for the agent
4) Enter the location of the FortiGate unit
5) Enter a contact or administrator for the SNMP Agent or FortiGate unit
6) Select ‘Apply’
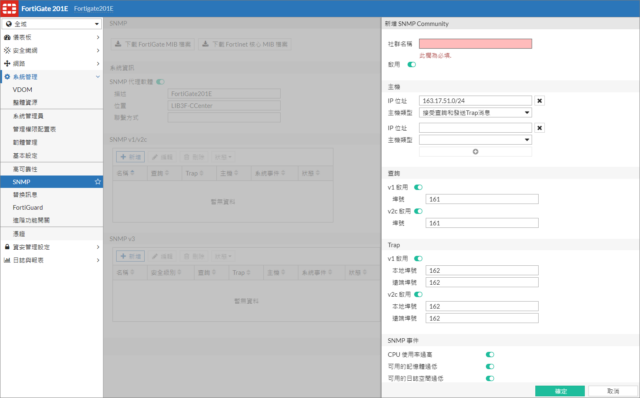
1-3.To add an SNMP v1/v2c community – GUI:
1) Go to System -> SNMP
2) In the SNMP v1/v2c area, select ‘Create New’
3) Enter a Community Name
4) Enter the IP address and Identify the SNMP
5) Select the interface if the SNMP manager is not on the same subnet as the FortiGate unit
6) Enter the Port number that the SNMP managers in this community use for SNMP v1 and SNMP v2c queries to receive configuration information from the FortiGate unit.
Select the Enable check box to activate queries for each SNMP version
7) Enter the Local and Remote port numbers that the FortiGate unit uses to send SNMP v1 and SNMP v2c traps to the SNMP managers in this community
8) Select the Enable check box to activate traps for each SNMP version
9) Select ‘OK’
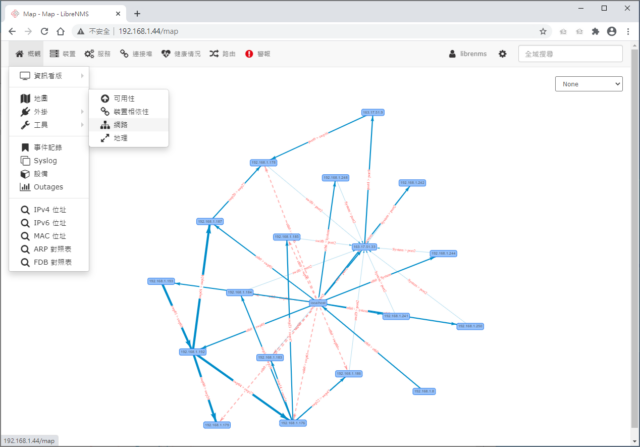
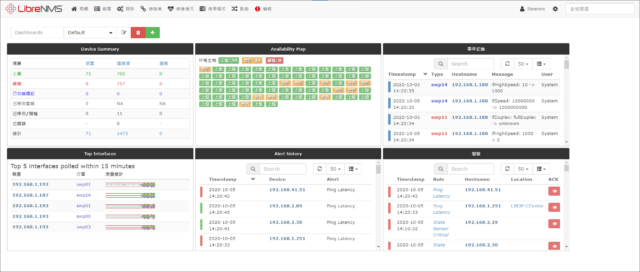
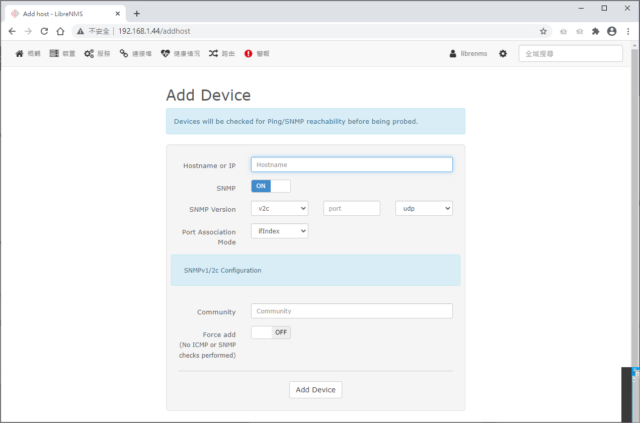
四、Librenms Add Device
五、在CentOS7上安裝及設定snmp
vi /etc/snmp/snmpd.conf

rocommunity public
syslocation LIB3F-CCenter

#Distro Detection
extend .1.3.6.1.4.1.2021.7890.1 distro /usr/bin/distro

#Hardware Detection (uncomment to enable)
extend .1.3.6.1.4.1.2021.7890.2 hardware '/bin/cat /sys/devices/virtual/dmi/id/product_name'
extend .1.3.6.1.4.1.2021.7890.3 manufacturer '/bin/cat /sys/devices/virtual/dmi/id/sys_vendor'
extend .1.3.6.1.4.1.2021.7890.4 serial '/bin/cat /sys/devices/virtual/dmi/id/product_serial'


systemctl restart snmpd.service
systemctl enable snmpd.service
snmpwalk -c public -v 2c 192.168.0.233
六、下載 Distro 指令碼
curl -o /usr/bin/distro https://raw.githubusercontent.com/librenms/librenms-agent/master/snmp/distro
chmod +x /usr/bin/distro

在 SNMP 中 Distro 回應值 (/etc/snmp/snmpd.conf)
請在最後一行加入
extend .1.3.6.1.4.1.2021.7890.1 distro /usr/bin/distro

完成後存檔離開並重啟服務
systemctl restart snmpd
firewall-cmd --add-service snmp --permanent
firewall-cmd --reload
firewall-cmd --list-all
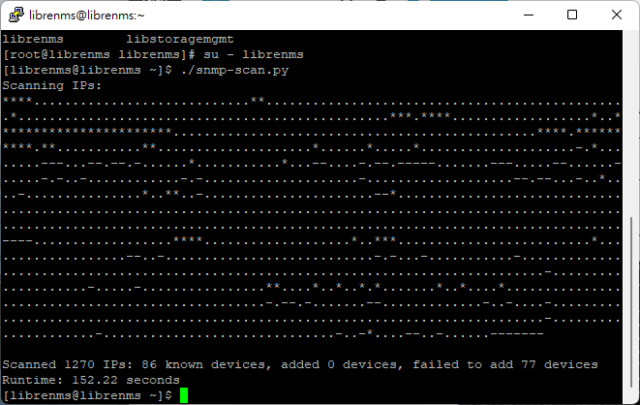
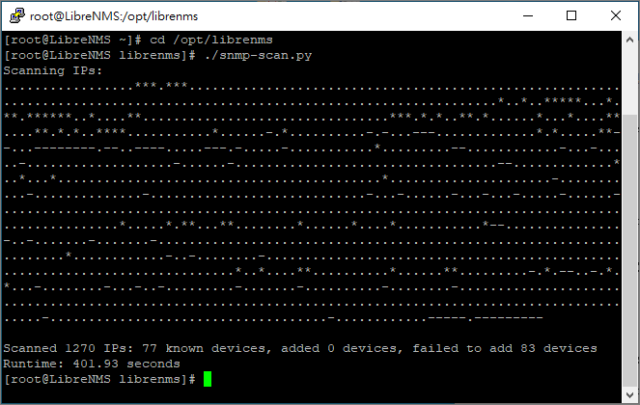
七、自動加入設備 snmp-scan.py
vi /opt/librenms/config.php
### List of RFC1918 networks to allow scanning-based discovery
$config['nets'][] = "192.168.1.0/24";
$config['nets'][] = "192.168.2.0/24";
$config['nets'][] = "192.168.41.0/24";
$config['nets'][] = "192.168.42.0/24";
su – librenms
./snmp-scan.py