Ubuntu18.04 LTS + DRBL
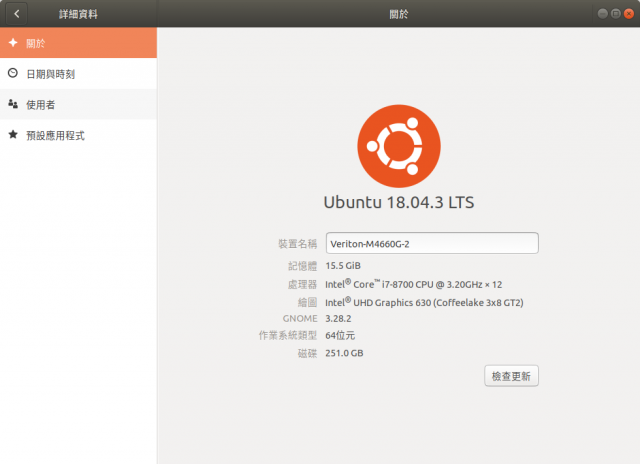
一、電腦型號及規格
1.電腦型號:Veriton-M4660G
2.HDD:INTEL SSDPEKKW256G8
3.CPU:Intel® Core™ i7-8700 CPU @ 3.00GHz × 6
4.RAM: 8G X 2
5.OS:Ubuntu 1804
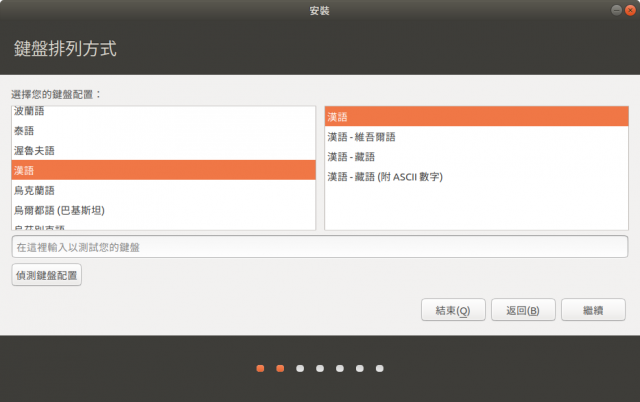
二、Install ubuntu 1804 漢語
二、安裝行列輸入法
apt-get install ibus-array
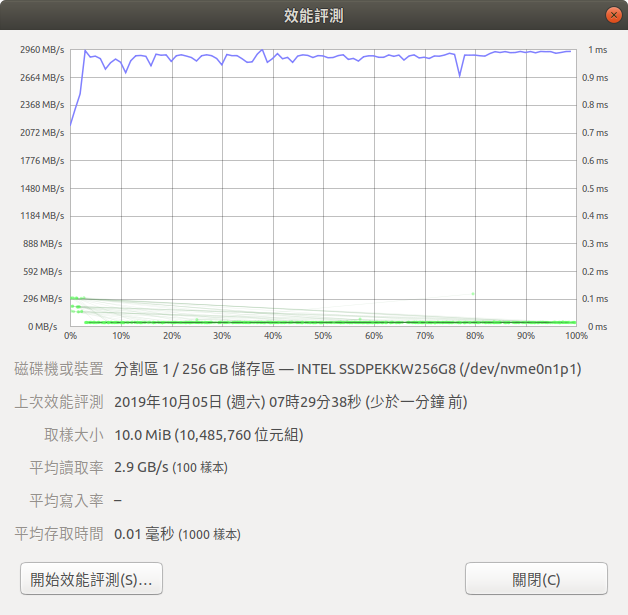
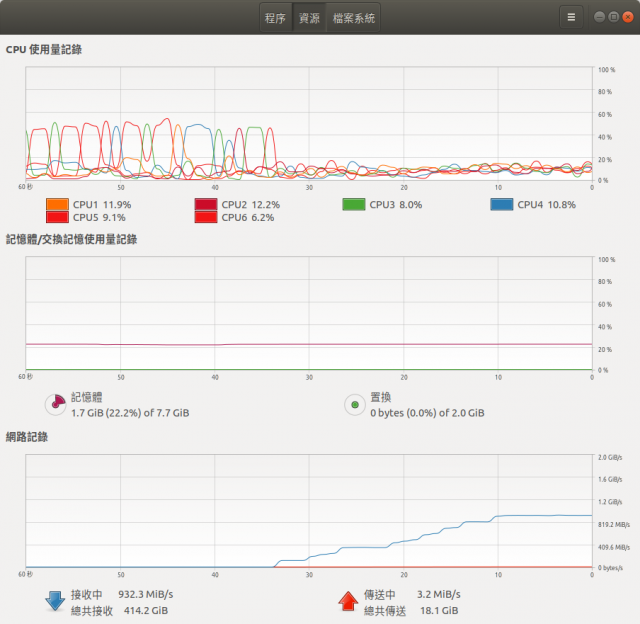
三、硬碟效能測試
四、網路卡設定
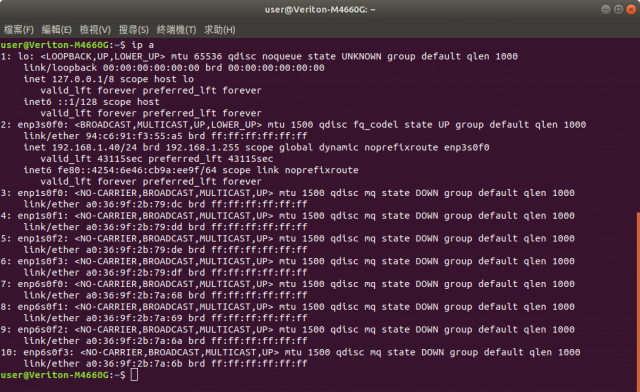
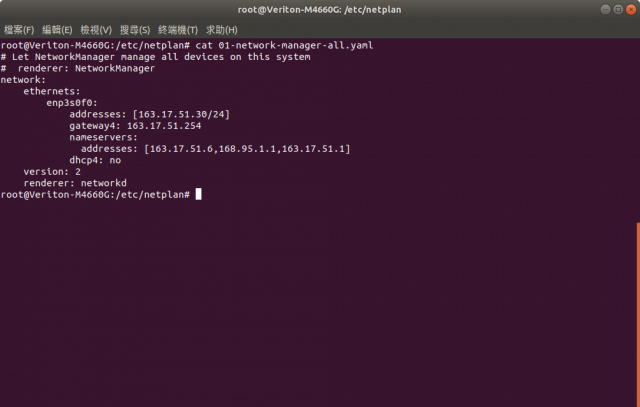
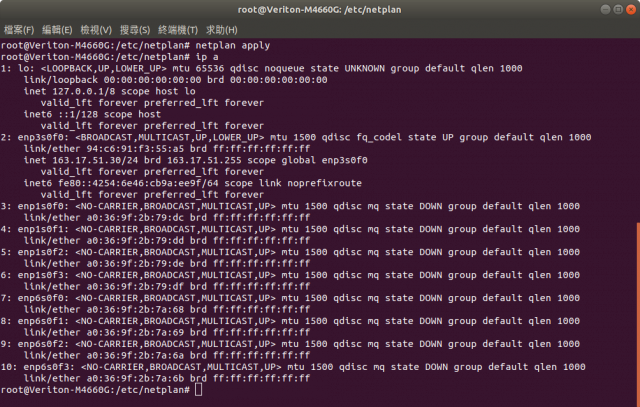
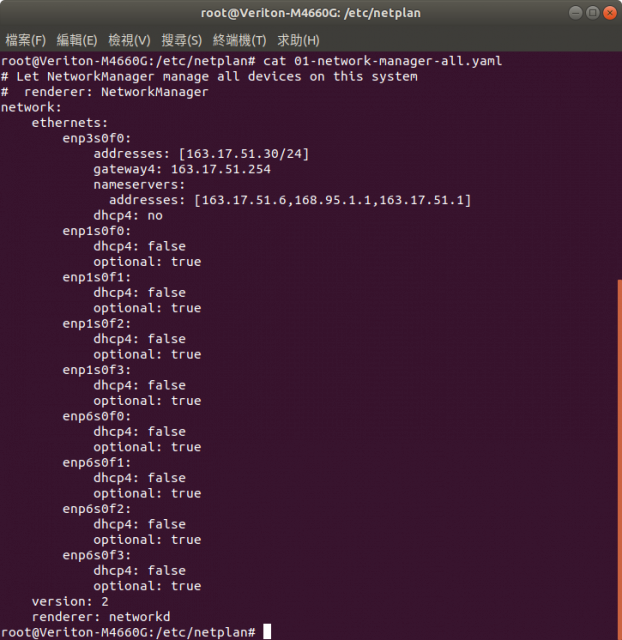
1.查詢網卡介面
ip a

2.Ubuntu 18.04 以後改用了 netplan 來做網路介面的管理
https://websiteforstudents.com/configure-static-ip-addresses-on-ubuntu-18-04-beta/

3./etc/netplan/01-network-manager-all.yaml

# Let NetworkManager manage all devices on this system
# renderer: NetworkManager
 network:
     ethernets:
         enp2s0f0:
             addresses: [163.17.51.30/24]
             gateway4: 163.17.51.254
             nameservers:
               addresses: [163.17.51.6,168.95.1.1,163.17.51.1]
             dhcp4: no
     version: 2
     renderer: networkd
4.bonding 設定
4-1.How to set up LACP bonding on Ubuntu 18.04 with Netplan
https://www.snel.com/support/how-to-set-up-lacp-bonding-on-ubuntu-18-04-with-netplan/
4-2.apt-get install ifenslave
4-3.vi /etc/modules
bonding
4-4. modprobe bonding
4-5. lsmod | grep bonding
5./etc/netplan/network-bonding.yaml
# This file is generated from information provided by
# the datasource.  Changes to it will not persist across an instance.
# To disable cloud-init's network configuration capabilities, write a file
# /etc/cloud/cloud.cfg.d/99-disable-network-config.cfg with the following:
# network: {config: disabled}
    network:
      version: 2
      ethernets:
        eports:
          match:
            name: enp1s0*
          optional: true
      bonds:
        bond0:
          interfaces: [eports]
          addresses: [192.168.11.1/24]
          nameservers:
            addresses: [163.17.51.6, 168.95.1.1, 163.17.51.1]
          parameters:
            mode: balance-alb
            lacp-rate: fast
            mii-monitor-interval: 100
6.cat /proc/net/bonding/bond0
Ethernet Channel Bonding Driver: v3.7.1 (April 27, 2011)

Bonding Mode: adaptive load balancing
Primary Slave: None
Currently Active Slave: enp1s0f3
MII Status: up
MII Polling Interval (ms): 100
Up Delay (ms): 0
Down Delay (ms): 0

Slave Interface: enp1s0f3
MII Status: up
Speed: 1000 Mbps
Duplex: full
Link Failure Count: 0
Permanent HW addr: a0:36:9f:2b:79:df
Slave queue ID: 0

Slave Interface: enp1s0f2
MII Status: up
Speed: 1000 Mbps
Duplex: full
Link Failure Count: 0
Permanent HW addr: a0:36:9f:2b:79:de
Slave queue ID: 0

Slave Interface: enp1s0f1
MII Status: up
Speed: 1000 Mbps
Duplex: full
Link Failure Count: 0
Permanent HW addr: a0:36:9f:2b:79:dd
Slave queue ID: 0

Slave Interface: enp1s0f0
MII Status: up
Speed: 1000 Mbps
Duplex: full
Link Failure Count: 0
Permanent HW addr: a0:36:9f:2b:79:dc
Slave queue ID: 0
五、關閉網路管理程式改為手動調整 How do I disable network manager permanently?
https://askubuntu.com/questions/1091653/how-do-i-disable-network-manager-permanently
For Ubuntu 18.04.1 LTS with GNOME desktop purging network-manager package will also purge ubuntu-desktop and gnome-control-center (essential part of GNOME desktop). So it is not an option.
Here you should disable NetworkManager service (as you have already done):
sudo systemctl stop NetworkManager.service
sudo systemctl disable NetworkManager.service
and three more services:
sudo systemctl stop NetworkManager-wait-online.service
sudo systemctl disable NetworkManager-wait-online.service

sudo systemctl stop NetworkManager-dispatcher.service
sudo systemctl disable NetworkManager-dispatcher.service

sudo systemctl stop network-manager.service
sudo systemctl disable network-manager.service
service network-manager stop
systemctl disable network-manager

service NetworkManager-wait-online stop
systemctl disable NetworkManager-wait-online

service NetworkManager-dispatcher stop
systemctl disable NetworkManager-dispatcher
systemd-resolve --status
 Global
          DNS Servers: 163.17.51.6
                       168.95.1.1
                       163.17.51.1
           DNSSEC NTA: 10.in-addr.arpa
                       16.172.in-addr.arpa
                       168.192.in-addr.arpa
                       17.172.in-addr.arpa
                       18.172.in-addr.arpa
                       19.172.in-addr.arpa
六、DRBL install
1.wget -q http://drbl.nchc.org.tw/GPG-KEY-DRBL -O- | sudo apt-key add -

2.vi /etc/apt/sources.list
----------
如果您的套件是Ubuntu Bionic (18.04):
----------
deb http://free.nchc.org.tw/ubuntu bionic main restricted universe multiverse
deb http://free.nchc.org.tw/drbl-core drbl stable

3.apt-get update

4.apt-get install drbl

5.drblsrv -i

6.drblpush -i
準備 mac address 檔
1.macadr-bond0.txt
f4:4d:30:0d:f0:41
f4:4d:30:0d:f4:12
f4:4d:30:0d:f0:1c
f4:4d:30:0d:f2:e1
f4:4d:30:0d:f0:f8
.
.
.

準備 ip - hostname 檔
2.client-ip-hostname
192.168.11.11 CA11
192.168.11.12 CA12
192.168.11.13 CA13
192.168.11.14 CA14
192.168.11.15 CA15
.
.
.
七、系統安裝後的調整
1.安裝字型(系統預設:/usr/share/fonts/字型檔放這(目錄亦可)
2.安裝 字型 ( 使用者: /home/使用者家目錄/.local/.fonts/ 字型檔放這
3.注意字型檔安權限(系統預設,給全體使用者使用時644)
4.應用程式安裝


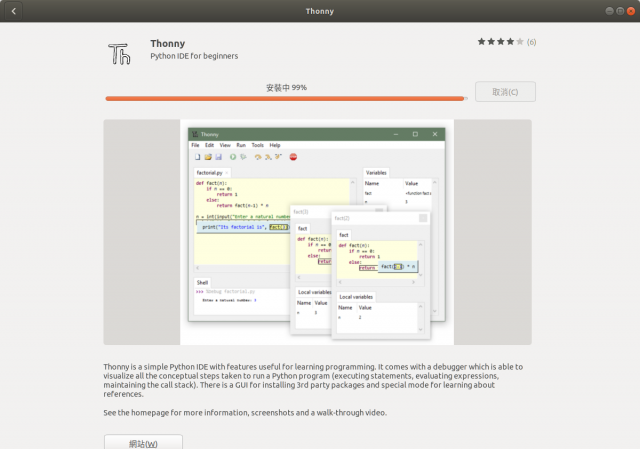
Thonny is a simple IDE specially designed for beginners. It has simple and easy use user interface with some basic features like debugger, code completion, etc. Thonny comes loaded with Python 3.6 built out of the box which requires simple installer to get started with Python programming.

八、效能測試
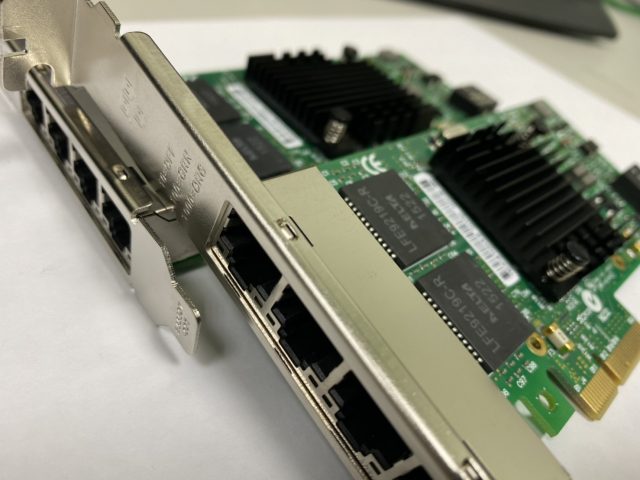
1.網路卡效能測試
Intel® 乙太網路伺服器介面卡 I350-T4 X 2


九、其它
1.「錯誤回報」Remove “System Program Problem Detected” Messages From Ubuntu
To disable the service, first edit the /etc/default/apport file:
Then change enabled=1 to enabled=0:

# set this to 0 to disable apport, or to 1 to enable it
# you can temporarily override this with
# sudo service apport start force_start=1
enabled=0
2.snap 軟體安裝
註:由snap 安裝的軟體無法在 DRBL Client 中執行

https://www.linuxidc.com/Linux/2018-05/152385.htm
2-1.Where is a snap stored and how can I change that?
https://forum.snapcraft.io/t/where-is-a-snap-stored-and-how-can-i-change-that/3194
By default they are in /var/lib/snapd/snaps
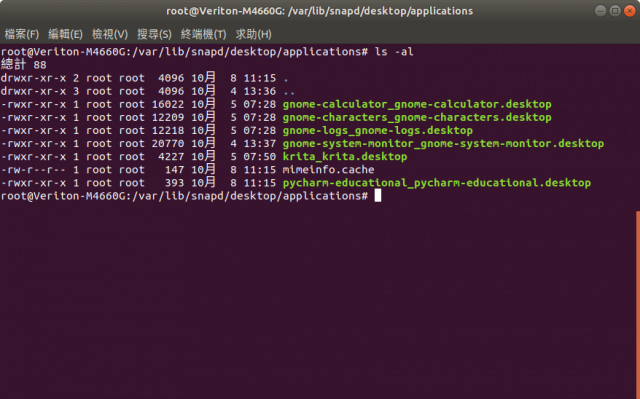
2-2.Add a Snap Icon to the Desktop Ubuntu 16.04
https://askubuntu.com/questions/800685/add-a-snap-icon-to-the-desktop-ubuntu-16-04
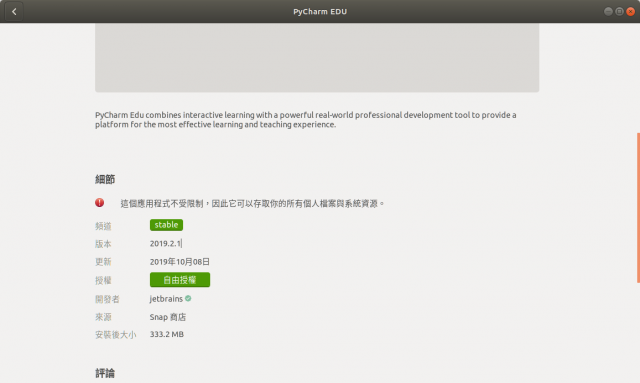
Currently .desktops for snaps are located in /var/lib/snapd/desktop/applicationspkgs版 pycharm-community-sloppy
https://www.itread01.com/content/1550187736.html
3.ubuntu-18.04 設置開機啟動腳本
https://www.itread01.com/content/1537549089.html
3-1.How to Enable /etc/rc.local with Systemd
https://www.linuxbabe.com/linux-server/how-to-enable-etcrc-local-with-systemd
1、建立rc-local.service文件

sudo vi /etc/systemd/system/rc-local.service
2、將下列內容復制進rc-local.service文件

[Unit]
Description=/etc/rc.local Compatibility
ConditionPathExists=/etc/rc.local

[Service]
Type=forking
ExecStart=/etc/rc.local start
TimeoutSec=0
StandardOutput=tty
RemainAfterExit=yes
SysVStartPriority=99

[Install]
WantedBy=multi-user.target
3、創建文件rc.local

sudo vi /etc/rc.local
4、將下列內容復制進rc.local文件

#!/bin/sh -e
#
# rc.local
#
# This script is executed at the end of each multiuser runlevel.
# Make sure that the script will "exit 0" on success or any other
# value on error.
#
# In order to enable or disable this script just change the execution
# bits.
#
# By default this script does nothing.

echo "看到這行字,說明添加自啟動腳本成功。" > /usr/local/test.log

exit 0
5、給rc.local加上權限

sudo chmod +x /etc/rc.local
6、啟用服務

sudo systemctl enable rc-local
7、啟動服務並檢查狀態

sudo systemctl start rc-local.service
sudo systemctl status rc-local.service
8、重啟並檢查test.log文件

cat /usr/local/test.log
如果能看到內容,說明設置成功,你就可以通過編輯rc.local文件來設置啟動腳本了
開機自動還原
root@Veriton-M4660G:/backup# cat /etc/rc.local
#!/bin/sh -e
#
# rc.local
#
# This script is executed at the end of each multiuser runlevel.
# Make sure that the script will "exit 0" on success or any other
# value on error.
#
# In order to enable or disable this script just change the execution
# bits.
#
# By default this script does nothing.

#echo "看到這行字,說明添加自啟動腳本成功。" > /usr/local/test.log

/backup/a.sh

exit 0
root@Veriton-M4660G:/backup# cat a.sh
#!/bin/sh

TODAY=$(date +"%d-%m-%Y")
strdir="CA53"

 echo $TODAY > /backup/log.txt
 echo $strdir >> /backup/log.txt

for userID in CA11 CA12 CA13 CA14 CA15 CA16 CA17 CA18 CA19 CA20 CA21 CA22 CA23 CA24 CA25 CA26 CA27 CA28 CA29 CA30 CA31 CA32 CA33 CA34 CA35 CA36 CA37 CA38 CA39 CA40 CA41 CA42 CA43 CA44 CA45 CA46 CA47 CA48 CA49 CA50 CA51 CA52 CA53 CA54

do
 rm -r -f /home/$userID
 cp -a /backup/$strdir /home/$userID
 chown -R $userID:$userID /home/$userID
 echo $userID >> /backup/log.txt
done

exit 0